
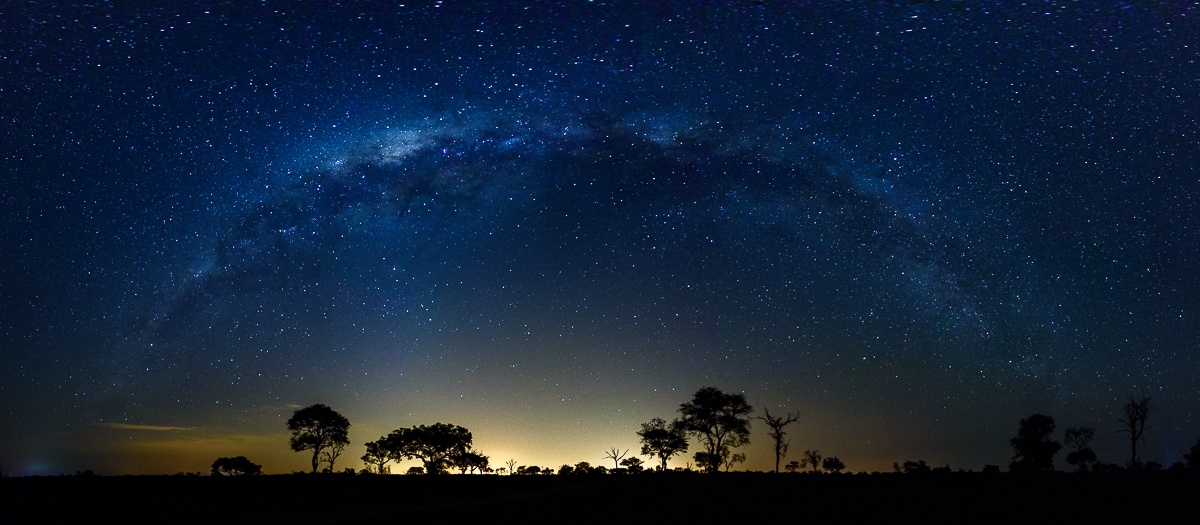
Photographing Starry Skies From a Safari
Photographing starry skies from a safari is one of the most rewarding experiences for travellers who enjoy photography and nature. Many safari destinations in East Africa have relatively little artificial lighting, allowing visitors to observe stars, planets and other celestial features when the sky is clear.
After an evening game drive in Uganda, Kenya or Tanzania, you may notice thousands of stars above your safari lodge. In suitable conditions, you may also see the Milky Way stretching across the sky. These moments create excellent opportunities for night sky photography.
However, capturing sharp photographs of stars requires more preparation than ordinary daytime photography. You need suitable camera equipment, correct exposure settings, stable support and a safe location.
Whether you are a beginner or an experienced photographer, understanding a few practical techniques can help you capture beautiful images of Africa’s night skies during your safari.
Why African Safari Destinations Are Excellent for Star Photography
Many African wildlife destinations contain large areas with limited artificial lighting.
Unlike cities, where streetlights and buildings brighten the night sky, remote safari camps may experience much darker conditions.
This makes it easier to photograph stars and other astronomical subjects.
Popular safari regions with potential for night sky photography include:
Serengeti National Park in Tanzania.
Maasai Mara conservancies in Kenya.
Amboseli National Park in Kenya.
Tarangire National Park in Tanzania.
Murchison Falls National Park in Uganda.
Kidepo Valley National Park in Uganda.
Actual conditions depend on your accommodation’s lighting, weather, moon phase and surrounding landscape.
A remote location does not automatically guarantee a clear view of the stars.
Cloud cover, dust and bright moonlight can reduce visibility.
1. Choosing the Best Time for Star Photography
Timing plays an important role in photographing starry skies.
The best conditions usually occur when the sky is clear, the moon is absent or less bright, and artificial lighting is limited.
Understanding Moon Phases
Moonlight can brighten the landscape and reduce the visibility of faint stars.
For photographs showing many stars or detailed sections of the Milky Way, nights close to the new moon are often preferable.
However, moonlight can be useful when you want to photograph tents, trees or mountains beneath the stars.
| Moon phase | Photography conditions | Best subjects |
|---|---|---|
| New moon | Darker skies | Milky Way and faint stars |
| Crescent moon | Some landscape illumination | Stars with foreground details |
| First quarter | Brighter surroundings | Moonlit landscapes |
| Full moon | Strong natural illumination | Landscapes and moon photography |
| Last quarter | Moderate illumination | Stars and partially lit landscapes |
Check the moonrise and moonset times for your destination before planning your session.
Even during a bright moon phase, the sky may become darker after the moon has set.
2. Best Camera Equipment for Safari Star Photography
You do not need the most expensive camera to photograph stars.
However, certain equipment makes the process easier.
Camera With Manual Settings
A DSLR or mirrorless camera that allows manual control of shutter speed, aperture and ISO is particularly useful.
Cameras with larger sensors often perform well in low-light conditions, although modern cameras with smaller sensors can also produce attractive results.
Wide-Angle Lens
A wide-angle lens allows you to include more of the sky and surrounding landscape.
Lenses between approximately 14 mm and 24 mm on a full-frame camera are popular choices.
A lens with a wide maximum aperture, such as f/1.8 or f/2.8, helps collect more light.
Stable Tripod
A tripod is essential for long exposures.
Even small camera movements can blur stars.
Choose a tripod that supports your camera securely.
When photographing from a lodge or campsite, position it on firm ground away from passing people.
Additional Equipment
Useful accessories include:
Spare camera batteries.
A remote shutter release.
A head torch with a red-light setting.
A clean lens cloth.
Extra memory cards.
A protective camera bag.
Cold temperatures can reduce battery performance, so keep spare batteries protected.
3. Best Camera Settings for Photographing Stars
Star photography requires longer exposures than ordinary wildlife photography.
Because the sky is relatively dark, your camera needs time to collect sufficient light.
Start with manual exposure mode.
Recommended Starting Settings
| Camera setting | Suggested starting point |
|---|---|
| Shooting mode | Manual |
| Aperture | f/1.8–f/2.8 |
| Shutter speed | 10–20 seconds |
| ISO | 1600–6400 |
| Focus | Manual |
| File format | RAW |
| White balance | Approximately 3500–4500 K |
| Timer | 2-second delay |
These settings are starting points rather than fixed requirements.
The ideal shutter speed depends on your lens, camera resolution and whether you want stars to appear as points.
Long exposures can cause stars to appear as streaks because Earth rotates.
Understanding the 500 Rule
Photographers sometimes use the 500 rule to estimate a maximum exposure time before noticeable star trails.
Divide 500 by the lens’s full-frame equivalent focal length.
For example, using a 20 mm lens:
500 ÷ 20 = 25 seconds.
However, this rule is only a rough estimate and may produce visible trailing on modern high-resolution cameras.
Shorter exposures often give sharper results.
Start with 10–15 seconds, inspect your photograph and adjust accordingly.
4. How to Focus Your Camera on Stars
Focusing is one of the most difficult parts of night sky photography.
Autofocus systems may struggle because the sky contains very little light.
Manual focusing is usually more reliable.
Step-by-Step Focusing Method
Set your lens to manual focus.
Point your camera towards a bright star or distant light.
Activate live view on your camera.
Magnify the image on the screen.
Adjust the focus ring until the star appears as small and sharp as possible.
Take a test photograph.
Review the image at full magnification.
Do not assume that turning the focus ring completely towards infinity will always produce perfect focus.
Some lenses focus slightly beyond infinity.
Once you achieve sharp focus, avoid touching the focus ring.
5. Photographing the Milky Way During a Safari
The Milky Way is one of the most interesting subjects for night sky photographers.
Under sufficiently dark skies, it may appear as a pale, textured band.
Long-exposure photography can reveal more detail than the human eye can normally see.
Finding the Milky Way
The position and visibility of the Milky Way change throughout the year and night.
The bright galactic centre is generally most accessible during certain months, depending on your location.
In East Africa, the months around the middle of the year can provide good opportunities to photograph the galactic centre during evening or night-time hours.
However, weather and moonlight remain important factors.
A sky-planning application can help you identify its expected position before your safari.
Composing a Milky Way Photograph
Include an interesting foreground whenever possible.
For example, you might photograph the Milky Way above:
An acacia tree.
A distant mountain.
A safari tent.
An open savannah landscape.
A baobab tree.
Foreground elements help establish the setting.
Keep the composition simple so viewers can clearly appreciate the night sky.
6. Including Safari Landscapes in Star Photographs
A photograph containing only stars can be attractive, but including the surrounding environment often makes the image more memorable.
Acacia Trees
Acacia trees have recognisable shapes that work well against the night sky.
Position the tree slightly away from the centre of the composition and allow enough space above it.
Mount Kilimanjaro
When visibility and location permit, Mount Kilimanjaro can provide an impressive foreground or background subject.
However, cloud cover may hide the mountain, particularly at certain times.
Safari Camps
A softly illuminated safari tent can create an appealing photograph beneath the stars.
Avoid bright artificial lighting that overwhelms the sky.
Always ask permission before photographing areas occupied by other guests.
7. Can You Photograph Stars Inside a National Park at Night?
Photographing stars inside protected areas requires careful attention to park rules.
Many national parks restrict movement after dark.
Even if you are staying inside a park, you may not be allowed to walk outside your accommodation compound without an authorised escort.
Wild animals can move around camps after sunset.
Elephants, buffaloes, hyenas and other animals may approach areas near lodges.
For this reason, never leave your accommodation alone to search for a photography location.
Ask your lodge manager or guide whether there is a designated safe area for night photography.
Private conservancies and some safari properties may provide more flexibility, but permission is still essential.
8. Photographing Star Trails
Star trail photography creates images showing the apparent movement of stars across the sky.
This effect occurs because Earth rotates during the exposure period.
Instead of capturing stars as individual points, photographers record their movement as curved lines.
How to Capture Star Trails
One practical method involves taking many shorter photographs and combining them later.
For example:
Use a tripod.
Set manual exposure.
Select an aperture around f/2.8.
Use exposures of approximately 20–30 seconds.
Capture photographs continuously for 30–60 minutes.
Combine the images using suitable editing software.
This method can produce cleaner results than one extremely long exposure.
Ensure your camera has sufficient battery power and storage capacity.
Remain in a permitted, secure location throughout the session.
9. Common Mistakes in Safari Star Photography
Several common mistakes can reduce image quality.
Using a Slow Lens
A lens with a narrow maximum aperture requires longer exposures or higher ISO settings.
Use the widest practical aperture available.
Incorrect Focus
Stars may appear blurred when the lens is not focused accurately.
Always check focus using a magnified live-view image.
Excessive Exposure Time
Long exposures can create unwanted star trails.
Reduce shutter speed when necessary.
Camera Movement
A weak tripod or unstable surface can cause blur.
Keep your camera secure and use a timer or remote release.
Ignoring Moonlight
A bright moon may reduce the visibility of faint stars.
Plan your photography around moon phases and moonset times.
10. Editing Star Photographs After Your Safari
Editing can improve the appearance of night sky photographs.
Begin by adjusting exposure and white balance.
Reduce excessive colour casts caused by artificial lighting.
Increase contrast carefully to make stars more visible.
Apply moderate noise reduction, especially when using high ISO settings.
Avoid excessive sharpening because it can create unnatural edges around stars.
If your image contains a landscape, adjust the foreground separately when necessary.
Keep the photograph realistic and preserve the natural darkness of the scene.
11. Safety Tips for Night Sky Photography
Safety is particularly important when photographing stars in wildlife areas.
Follow these precautions:
Never walk alone outside a safari lodge after dark.
Ask your guide about safe photography locations.
Avoid approaching wild animals.
Keep equipment within designated areas.
Use lighting carefully.
Do not leave tripods where people may trip over them.
Protect equipment against rain, dust and moisture.
Follow all park and lodge regulations.
A beautiful photograph should never require unnecessary risk.
Photographing starry skies from a safari allows you to capture Africa’s landscapes under very different lighting conditions.
Remote safari destinations can offer excellent opportunities for Milky Way photography, star trails and night landscapes when weather and moonlight are favourable.
Successful photographs depend on suitable equipment, accurate focusing, careful exposure settings and thoughtful composition.
Most importantly, plan your photography activities around park regulations and wildlife safety.
With preparation and patience, you can return home with memorable photographs of Africa’s night skies alongside your daytime wildlife images.



No comment